3D tutorials, tips and techniques, inspiration and community.

Tuesday, December 13, 2011

Creating a 3D Illustration for a Book Cover in Blender

Elizabeth Castro just published a new book about EPUB production, with the title From InDesign CS 5.5 to EPUB and Kindle. She asked me to create an illustration for the cover. This is just one more book in a series of miniguides about the same topic, so I decided to continue with the same general theme as I used in the first cover illustration I created for this series. I wanted to maintain the diagonal element on the front cover, and leave the back cover relatively empty. Also, I wanted to keep some sort of horizontal divider. Other than that, I knew I had to use some image that made some reference to the word point, since these minguides are all expansions of the original Straight to the Point book. That's where the dart idea came in. This is the final render.


Final render, at a smaller resolution. In order to choose a render resolution,
I multiplied the size of the cover, plus bleed, by 300 (as in 300 dpi) and that
gave me the final size, approximately 3500 x 2700 pixels.
The white line (not in the actual final image) separates the front cover from
the back cover.
This is the final cover design (not done by me).
All the models in the image were created in Blender from reference images of darts and dartboards. The final render was done in Cycles, the new render engine recently incorporated into Blender. What's great about Cycles is that it allows for real-time render previews, which takes away a lot of the guessing related to lighting. Another great thing is that it's a physically correct renderer, which means that you can achieve realistic-looking results with less fidgeting than with Blender's original render engine (Blender Internal). Also, it does depth of field beautifully, and although it is physically-correct, it still lets you cheat your way out of any problem. Unfortunately, at the time I'm writing this, it still does not support compositing, otherwise I would have added some motion blur. Actually, I could have added it in Photoshop, but we decided against it because we wanted something simpler—it's a book cover, not a video game!

Here is a clay render of the models' wires.


Many of the original materials are relatively complex, and involve mixing two or more layers (‘nodes’ in Cycles parlance) to achieve a certain effect. What's neat is that you can save node groups to be reused later on, even across files, which is a real time saver. I am attaching a screenshot of the node setup for the red plastic with black lettering on the dart fletching. Roughly, the red plastic finish is achieved by combining a Glossy and a Matte material, but the mix is controlled by a Fresnel node, which determines the intensity of an effect depending on the view angle of the camera. The lettering texture defines what is red plastic and what is black—just like an alpha channel in Photoshop.


Sunday, December 11, 2011

Opening Multiple Copies of Blender on Mac OSX

Up until recently, I thought that there was no way to have several windows (or copies) of Blender open at the same time on Mac OSX. Actually, this rumor has been spread around both in the Blender forums and in the real world, to the point one would even doubt the validity of using Blender on a Mac—some people in the Win-Blender community can be so snide against the Mac sometimes... :D Not fair.

Anyway, I just discovered a very easy way to get around this apparent limitation. My solution does not involve having several copies of Blender, but rather using the Terminal to open multiple copies of the same Blender application. Yes, the Terminal, that little known utility that scares most Mac users out of their wits, or at least it used to have such an effect on me.

There are two things you need to know about the Terminal. First, you can navigate to any folder in your Mac from within a Terminal window. To do so, you open a new Terminal window, type cd (which stands for change directory,) and enter the name of the folder or file you want to have accessible. After that, just press Enter. The Terminal allows to autocomplete file and folder names by pressing Tab. To make sure you are where you're supposed to be, type ls (for list) and press Enter. That shows you the files in the folder you are viewing. You can type an entire path to a specific folder or file by separating the folder inside folders with a /. To backtrack, type cd .. (that's two dots) and press Enter. To go to the root user folder, type cd ~. These basic commands will allow you to start navigating your Mac from the Terminal.

The second things is that you can perform commands from the Terminal. You can open programs and files, edit them, save the changes. Actually, it can do this and more, but at least it is important to realize that you can open a program from the Terminal. In order to work on a file, you need to navigate to the folder where that file is contained—in the same way that, in order to open a file, you need to go to the folder and double-click on its icon.

Once you can do that, go ahead and start a new Terminal window. Navigate to your Blender application folder. Yes, what we see on the Finder as Blender is not a program, but a package: a special Mac folder that contains the program itself and other files used by the program, like the icons, scripts, and default file. Anyway, navigate inside your Blender package, all the way to the folder where the actual program resides. If you have Blender in the main Applications folder in your Mac, the path to it would be (assuming you start from your user folder):
cd ../../Applications/blender/blender.app/Contents/MacOS/
Then, once you're there, open Blender by typing

./blender

The terminal spews out a couple of unintelligible lines, which I choose to ignore:


ndof: 3Dx driver not found
found bundled python: /Applications/blender/blender.app/Contents/MacOS/2.60/python
[Lux 2011-Dec-11 13:37:01] Using pylux version 0.9 (dev)

In any case, the end result is that you get a new Blender window open, independent of the other(s), and it allows you to work with two files at the same time! Cool stuff. I would suggest saving this text somewhere, either as text or as a script, so that you don't have to enter it manually every time. If I work out a Python script for this, I'll make sure to share it.

Enjoy!

Thursday, December 8, 2011

Cycles Nodes Microtutorial

Recently, I opened an older Blender file I had used to do some test renders in Cycles, and I noticed that some of the materials were broken. At first I thought that the new Cycles had changed so much that the older setup was no longer compatible. Then, I realized that the reason for the broken nodes was that I had not connected some of the node inputs into outputs of the same color. Cycles was fine, after all, and all that was needed was that I connect same color with same color. So this is the tutorial.
Very basic: for Cycles nodes (and for any node, in general) connect same color to same color. That's it.

There are a few colors, and this is what they mean:
Yellow: an RGB value.
Grey: a Greyscale value.
Green: a Shader (which is the same to say as Cycles material)
Blue: a Vector. A vector is a hard concept to explain. It has to do with the projection mode of the material on the model polygons, and the scaling and manipulation of the texture in its own local space. In essence, a vector is a way to describe a dimension. In Cycles, it is mainly, but not only, used to define the texture space (generated vs. UV).

I just Control-A added some nodes, doesn't much matter which. Notice that they all have different colors for the input
and output. It is essential to notice those colors, and connect things in the right order.

I connect the nodes. The final material is a Mix Shader with a B&W displacement from mixing a texture plus a color. The texture will be used in a Generated vector way, and scaled 5 times up (which make sit 5 times smaller—really). The Diffuse and Glossy shaders used in the Mix Shader don't specify a Vector, which in Cycles is UV by default.
So, to sum it up, connect same colors with same colors!

PS: here are two screenshots of a scenario where the material gets broken. Before and after. All I did was connect same color to same color. I think it worked.

Disconnected

Connected by following the rule

Tuesday, December 6, 2011

Photoshop's 3D Tools Reviewed

I've owned the extended edition of Photoshop CS5 for a while now, but I had never given the 3D tools included in it a thorough look. At first sight they might seem like stuffing in a turkey, but I decided to dig in, and see what they could be good for, and whether they could be used in a production environment.

When you open Photoshop CS5 Extended Edition, you get this new (to me) 3D menu with some functions that allow you to import 3D files into a layer and texture and render them, You also get a new 3D palette, where you control the 3D content at the scene, mesh and, material and light level. You can just use the File -> Open command to include 3D mesh into 3D layers.

Photoshop does not have quite as extensive a render toolset as that of many 3D packages, but that is to be expected: Photoshop is not a 3D tool. What it does, however, it does pretty well. I wish some of the 3D packages I use got some UI tips form it. Photoshop's functions allow you to create quick mock-ups and even some nice compositing effects very quickly and efficiently. Some of the best UI ideas include the way in which texture files are saved and edited  internally with the same PS file, and how they are displayed at the layer level.

One very good feature is the handling of material textures. You can create and save internally within the very same file a number of textures to be used on your model. These textures can affect the usual suspects: diffuse, opacity, bump, normal, environment, reflection, illumination, glossiness, and shine. Photoshop comes with an array of pre-defined materials with their own set of textures, which is a really good feature. Apparently, you can download user-made materials from the Adobe site, another good thing. Also, if you import an UV-mapped model, you can superimpose the UV layout automatically with the Create UV Overlays command—a real timesaver. Also, you can control the scene lights reasonably well. The light types are limited to Spot, Point, and Infinite.

However, when it comes to real power and flexibility when texturing in Photoshop, there are a few important limitations. I would recommend UV mapping externally, because Photoshop only has two automatic unwrapping options, which may or may not be what you need—most likely not. Basically, you can't apply seams and fine tune the unwrap. Also, I tried real-time bump texture painting, a really cool feature which I already used in Blender (see this tutorial,) but surprisingly pressure sensitivity seems to stop working when painting directly on the model.

On the downside of things, we have a lack of true camera control, useful if you're thinking of using Photoshop as a compositing and special effects post-render complement. The camera cannot be seen anywhere, and it is controlled through either some tools on the toolbox or right on the toolbar. I tried positioning it to match an existing scene, but axis and rotation values are not consistent among applications, and I did not have the patience to figure out Photoshop defaults.


New tools for controlling the position and rotation of the camera, both accessible through the toolbox
and the toolbar.

There are a quite few more 3D tools in Photoshop, most of them for extruding and 3D-izing images and selections within images. These functions are somewhat similar to Illustrator's 3D tools, although a bit more mature. I can see how they are really good at creating quick and dirty mock-ups, and with a bit of post-processing, they can be great, even brilliant :)

In the end, there is one final factor that means that, although Photoshop excels at 3D production tools, like UV painting, I don't think one can realistically use it as a true 3D package. I'm referring to the lack of global illumination. It does have raytracing shadows, but they look just like that: 3D shadows. The lack of radiosity inevitably gives the renders a 90's look. In any case, like I said earlier, Photoshop is not a 3D package, and this is just extra stuff you get if you think you might need it. In the end, it is a very solid tool, and I can see it expanding into some mesh sculpting in the future, although I think that 3D painting is where Photoshop could really excel, and the foundations are already there.

Friday, December 2, 2011

I Started Selling Models on Turbosquid!

So the title says it all. I decided to dust off some of my old models, get them all cleaned up, do some renders for the thumbnails, and start selling them on Turbosquid. So far I only uploaded one file, an old sports car I modeled for this Mac racing game, Redline. Because I am using the word "Porsche" for my model (it's a Boxster,) Turbosquid decided to put my submission up for review. Once it passes that review, the model is made available for purchase. Fingers crossed!

One of the things I like the best about Turbosquid so far is that they seem very well organized. Model sellers have a dashboard where they see all the models they have updated, their status, and the sales. It seems that once you start selling, your own status as a seller changes as well, and you get colored diamonds, Makes it seem like a game :).

Here is one of the renders I submitted for a thumbnail. The model itself is low-rez, with somewhere between 4K and 5K polygons, which is optimal for that game in question.


Wednesday, November 23, 2011

Subway Scene 7 - in Cycles

I decided to try and finish Subway Scene. I still don't know exactly what it'll turn into, but I decided to begin texturing it. I also did a few noisy renders with Cycles, just to test things out. More to come.

Notice the amount of noise. 400 samples wasn't enough to begin getting rid of it.

Wednesday, November 16, 2011

Rally Car Scene

Here is a screenshot of the very early stages of a rally scene I'm working on. More to come.

Working on the car rigging.

Friday, November 11, 2011

Real Time Bump Texture Painting in Blender

Originally, I was going to create my first videotutorial on making-real time bump maps via texture painting on GLSL view mode, but there is this Blender Cookie video already, by David Ward. So, anyway, it's a great technique, very useful to add detail intuitively where there's not enough geometry, as a way to keep the poly count down. It's also a great alternative to using a Multiresolution modifier, although I like to combine it with some basic sculpting. I really recommend it. I've been using it on this model I've been working on for Tube. Here is the link to the tutorial. Thank you David!

Never Say Final - Coke and Cookies

On my last post, I used a forbidden word in production circles: final. Over the years, I've learned to avoid using it. It's meaningless. Nothing is final—except death, that is. I used it again, and again it exacted its revenge on me. It was supposed to be the final render—really-really final, or double-final, or final-final, or final-2. I've used them all over the years :)

After I had posted that render, the next morning I woke up and I noticed an incredible spike on this blog visitors' count. On a good day, I get somewhere between 50 and 150 visitors. At 8AM yesterday it was at 400 already. I checked the source of the traffic, and I discovered it was coming from BlenderNation, a Blender News web site. Apparently, this BlenderNation admin, Bart, liked my Coke and Cookies render, and put it up on their site. On top of that, blender.org, who usually mirror BlenderNation's news and posts, linked to that post as well. This incredible, two-pronged combination did the trick, I ended the day hitting the 2500 mark. I'm not complaining, I love the attention, and I like talking to people about Blender and Cycles and anything else 3D. Everything 3D.

Another interesting thing about what happened with my being featured in another site is that, all of a sudden, my artwork had become. It got away from me, and it started having an independent life all of its own. It got out into the world, and that was that. It's a funny feeling, but also a good feeling, and a wake-up call concerning the obsessive pursue of perfection. You want your work to be perfect, but in order to achieve it, you keep tweaking and futzing and fidgeting with things, but it does not necessarily get any better. It's just that you get all caught up in the creative process. Or maybe you're just an addict :) Sometimes it is better to leave the freshness of the first impulse as is and not worry about the imperfections. Some examples related to this idea come to mind: the Aeneid is not a finished poem, someone refused to burn it as Virgil demanded on his deathbed. One more: Paul Valéry's Le cimitière marin was published before he could 'finish it.' His over-eager publisher friend took it away from him and decided it was good enough. The hutzpah!

Anyway, for all these reasons, I wanna send a big thanks to BlenderNation, blender.org, and all the visitors to my blog. THANKS!

Oh, and here is the really-final render! I could not resist changing a few things around ;) If you liked the former version better, you know where to go :) Just click on final.

Also, I've decided to release the coke model as open-source file. It seems like there are many others trying to create soda bottles, so perhaps it can be helpful. Send me an email and I'll send you the file, minus the textures.


Render at about 3000 samples, with some
post-processing work done in Photoshop.

Wednesday, November 9, 2011

Coke and Cookies - Final Render

Here's the final render of my Coke and Cookies scene. I'm going to leave it like it is now. I added some water on the table and a washcloth. Cycles finally decided to stop crashing, and I was able to do a proper render this time. Three hours for 1500 samples. I sharpened it a bit in Photoshop—I don't quite like Blender's Sharpen filter.

Background image used under Creative Commons license
from http://www.smartibl.com/sibl/archive.html
PS: I woke up this morning, and I noticed an unusually high level of traffic on my blog. Then, I slowly realized that both Blender Nation and blender.org are mentioning my work on their sites today! Thank you guys! It doesn't happen every day... LOL

Tuesday, November 8, 2011

Random Thoughts #1

I've been helping out at the Tube project for a few weeks now. So far, it's been a great experience. Working right next to Bassam Kurdali has been great. He's a very patient and generous person. Plus he works non-stop, and he seems to know just everything about Blender! I can't believe how inspirational it is,and how much I feel like I'm learning. Although I'm not contributing a whole lot (yet), the little I've done has already pushed my limits a bit. Just being there and hearing and talking about SVN stuff, or about Python's greatness, and about different ways to efficiently manage texture assets is just what the doctor ordered :)

Out of all that, I discovered a very neat technique for painting bump textures real time, so the guesswork is a bit reduced. It feels a bit like sculpting, except it's not. One of these days I'll post what I hope to be my first video tutorial on this subject. Let's see how it turns out.

Anyway, there are many more things I'd like to work now, like this Blender e-book for beginners organized in several lessons. Speaking of lessons, I've been teaching webinars on Cheetah3D lately, and that's been going really great too. I hope to be able to put some Blender webinars together as well. I need to start thinking about ideas for those. Anyway, off I go, I need to be working on my next scene, which will probably be a rally car scene, something fun and full of dust and grit and excitement.

Monday, November 7, 2011

Coke and Cookies - 2

Here is an update of the Coke and Cookies scene I've been working on. I think it's pretty much done now. Creating all the materials and setting up the scene has given me a greater understanding of how Cycles works. There's nothing like getting your hands dirty to learn something new!


Sunday, November 6, 2011

Coke and Cookies Scene in Cycles

Here are a coupe of renders of a scene I'm working on in Cycles. I call it Coke and Cookies. I think the reflective materials are the reason why I'm getting so many fireflies. Fireflies are those super shiny spots on the image that seem like they don't belong in there. Anyway, it's a work in progress, we'll see where it leads...


Monday, October 31, 2011

Dartboard Scene Part 3

Here is an update to the Dartboard Scene I've been working on. It's supposed to be the whole front and back cover for an upcoming book about epub. The image I show here is not a real Cycles render, but rather, three renders, composited in Photoshop. I don't think that Cycles can do motion (or vector) blur yet, so I added that in Photoshop—with the Motion Blur filter applied several times, offset and masked with a layer mask. Here is the result.

This is the (almost) final version, minus the copyright.

Sunday, October 30, 2011

Reusing Cycles Materials the Smart Way

Lately I've been working with Cycles quite a bit. I'm creating a new illustration for a book cover, and I decided I would do the render in Cycles. Tweaking the lights and the materials in Cycles is really fun, because you can see the results in pretty much real time, which takes away much of the guesswork associated with materials and final appearance.

One of the objects I'm modeling is supposed to be made of red plastic. Cycles comes with a quick and dirty, default “shiny plastic” shader—it's called Glossy. However, I feel that the Glossy material does not yield a very convincing plastic. I decided to try something niftier. I'm talking about a Mix Shader. A Mix Shader is a material that is the result of mixing the properties of two other materials.

In a Mix shader. you can specify which areas receive material A, and which areas receive material B through a grayscale image input, which you can customize on the Fac input in the material panel. Among other fun facts, Fac can be controlled by what's called a Fresnel. In 3D applications, fresnel defines the transparent versus reflective mix in a material. You notice the effect when looking at a small body of water from a shallow angle and the water becomes reflective instead of transparent. In Cycles, using the Fresnel to control the mix of two materials, where one of them is shiny, can produce, in my opinion, a very convincing plastic material.

The interesting bit of this is that you can create a material, itself a Mix Shader material, and plug it into slot A or B of another Mix Shader material. To do this, you need to go to the Node editor, group the nodes that make up that material, and group them. Cycles will save that group as another material option in the pull down menu that show up when creating new materials. Basically, you can save very complex material setups and reuse them by just selecting them from a menu! Sweet stuff! Here is an overview of this workflow.


First, we create a red plastic material. This is the setup used for the Red Plastic material, shown here both in the Material panel and in the Node editor. Every option in the Material panel gets reflected in the Node editor.
Note: at this time, some nodes (or options) can only be accessed from the Node editor at the moment.

Next, we create a node group, which we'll use later as part of another Mix shader.


Very quick render showing the red plastic material so far.
The next step would be to create a new Mix Shader material.
Then, we'd choose the Red Plastic node group we just created on the shader slot A.


Here's the rest of the setup. We use a simple, plain white Diffuse
shader on slot B. For the control texture, I'm going to use a striped
texture. I'll choose Generated for the mapping of this texture, and we're done!


Final render, at 100 samples. Red plastic stripes with white diffuse material.


Wednesday, October 26, 2011

Hello Mac mini

As I think I promised, I am giving an update on the dead MacBook saga. A new Mac mini (2011 version) arrived yesterday via UPS. I loaded it with 8Gb of RAM, an i5 processor (I did not have the patience to wait two weeks for an i7,) and an AMD GPU with 1/4Gb dedicated memory. It's not the fastest computer on the face of the Earth, that's for sure, but it's perhaps ten times faster than the one I had before. So far, it has performed flawlessly, out-rendering any renders I had from before.

The only thing I'm a bit afraid of is to have Cycles run on it. My last computer died from a Cycles indigestion, and I've been wondering whether there's anything wrong in Cycles' memory management that pushes things to an unhealthy extreme. One thing I noticed is that GPU rendering does not work with the GPU in the Mac mini. Too bad :( Another thing I noticed is that Cycles gets the Mac mini cranking big time. Although normally it is a pretty silent machine, as soon as I get Cycles going, it begins to spin, get warm and sputter. I don't think I dare leave it all alone during a render! Anyway, I'm sure I'll get used to it.

One more thing I wanted to talk about is the migration process from a Time Machine backup into a newer Mac. In my experience, it worked OK. However, there's this very annoying thing that happened. Instead of porting my original user from my older Mac and making that the root admin user, with all the settings intact and whatnot, the Migration Wizard created an entirely new user, luckily an admin too, and plonked everything in there. Like in the old times, I've had to move everything over manually. I refuse to have two admin users in one computer that will be used by just one person! I spoke to Apple, and the guy basically said "Sorry, that's as good as it gets." Suddenly, it does not feel like the 21st century anymore.

Thursday, October 20, 2011

Mac mini. Seriously?


I think that buying a Mac is hard. Especially when you don't wanna break the piggy bank by getting a full-fledged, loaded-up Mac Pro. Apple is still missing what I call a mid-range, power-user-wannabe Mac. This would be a decent-sized box with a little bit of room for expansion, and no monitor or keyboard included. I imagine it as something like two or three times the size of a Mac mini, and with just a few expansion slots. Nowadays, if you want to even dream that you might be able to expand your Mac, you either think really really big (Pro) or don't think at all (the rest of them all).

Given the configuration of the top line of the most recent Mac minis, I think they are not a bad deal. Perhaps they're even a great deal. I'm gonna try one and see. I have a feeling that I won't be disappointed. For one thing, it comes with a nice CPU (2.5 GHz dual-core Intel Core i5) and a dedicated GPU (AMD Radeon HD 6630M with 256MB of GDDR5 memory).

This guy at the Apple Store started eating my head (see if you can figure out what that means!) about dedicated vs. integrated GPUs. He then pointed out that Apple already has a mid-sized Mac with dedicated GPUs: the iMac. To me, it all sounds like a complicated marketing scam: an iMac looks to me just like another monitor in the house, and I've seen plenty of those at the dump lately. However it may be, two days ago I had no idea there was such a thing as a dedicated GPU, but now, here I am, blogging about it, pretending I'm an expert. To the point: a dedicated (or discrete) graphics card comes with its own memory, so it does not have to steal any RAM from the main memory.

Additionally, I like the idea of using a low-consumption machine, and the Mac mini seems to be precisely that. I hope that it won't get as hot as the last unfortunate render-engine fodder I was using before.

So what else is good about this Mac mini? Hmm... Oh yes, it'll be the second Mac I've ever bought. Actually, the first one, since my first one was a Power Computing machine. Remember those? Up until now I've survived on hand-me-downs. Here's a render to celebrate the occasion.


Wednesday, October 19, 2011

Goodbye MacBook

Today, while trying to render the final Dartboard scene using Blender's new render engine Cycles, my old computer died. Apparently, the logic board got too hot. I took it to the Apple store near me and they confirmed that the logic board was fried. I was lucky to have a recent backup, but even so, it's a bit of an annoyance. So, now I'm shopping for a new Mac. I've been really thinking that I'll get a Mac Mini. Why on earth did Apple call it Mac Mini? What a horrible name. Anything would have been better than Mac Mini—how about Mac Pancake? Anyway, I'll try to forget the male-challenging name and buy one. I can definitely not afford or justify a Mac Pro, which is what I really would like to have. On the other hand, I've been toying with the idea of building my own PC, but the idea of not using a Mac anymore is not a pleasant one. I'll keep everyone posted.

Monday, October 17, 2011

Dartboard Scene Part 2

Here is an update of the Dartboard Scene, this time rendered at full size (but not full resolution), and with Cycles. Cycles is the upcoming new render engine for Blender. It's a bit like Luxrender in that it is a physically-correct, unbiased render engine. Unbiased means that you can have the render go on for as long as you want. Although Cycles is still a bit of a work in progress, I think it's ready for production time, especially for still images.


Friday, October 14, 2011

Dartboard Scene Part I

Here is a render of a scene I'm working on in Blender. It's not complete yet, this is a preliminary render, done in Blender Internal. I'm not sure whether I'll do the final render with Cycles or with BI, but using some Freestyle module to stylize the look a bit. Realism is not my goal here. We'll see where it goes.


Monday, October 3, 2011

Internship at Bit Films for the Tube Project

Today I started an internship at Bit Films working for the Tube project, which is a short animated film created with open source tools like Blender. Bassam Kurdali, whom I met today, is the director of the Tube project. He was also the director for the first ever open movie—Elephants Dream. He is a bit of a celebrity among us blenderheads :)

I feel really excited about working on this project. Although right now it feels a bit overwhelming, I think it will be a great chance for me to learn a lot more about Blender, and about animation and movie-making. Also, it will be great real-world experience in the production of an animated short.

I think I am mostly going to be focusing on modeling and asset management. The project uses SVN (Subversion) for version tracking, but there seems to be some need for extra organization, which happens to be one of my strong points. I hope to be learning a lot about the different aspects of the program, from data management to modeling and animation. I am sure that working with a team of talented people will be very exciting.

Saturday, October 1, 2011

Book Cover Art for Read Aloud EPUB, by Elizabeth Castro

I recently created an illustration for a book cover by Elizabeth Castro. The book is titled Read Aloud EPUB for iBooks Miniguide. I created the pencil in Blender, where I feel more comfortable modeling. Rendering was done in Cheetah3D, although I think Blender would have been more than capable of producing decent results, especially with the Cycles render engine. I did all the post processing in Photoshop, although, again, Blender would have probably been fine as well.


Thursday, September 29, 2011

Grenade Explosion in Motion

Here is the grenade explosion movie that I promised. So much work for a mere 2 second animation...

Tuesday, September 27, 2011

Hand Grenade Tutorial Image


I just finished the How to Make a Hand Grenade tutorial by Andrew Price. In this tutorial, Andrew covers many aspects of blender: modeling, blueprints, texturing, UV mapping, image-based lighting, fracture tools, particle systems, compositing, basic animation with keyframes, and the use of the F-Curve editor. Wow! I think this is probably Andrew's most comprehensive tutorial to date. Good job!

Here is my result. I'm not entirely happy with it, but my computer is going super-slow.

The original greande, right before the explosion.

Here you can see the explosion. It is composed of the original grenade, broken up
by the fracture tool and a particle system that controls it. It also has an additional
particle system that shoots out the shrapnel pieces. The glow of the explosion is
simply an object with a semi-transparent orange material with a 


Wednesday, September 21, 2011

Review: Introduction to the Cycles Render Engine by Jonathan Williamson

I just finished watching the fantastic intro tutorial to the Cycles render engine, which is set to be part of Blender default package. Jonathan has a great style and very clear explanations. It really shows that he prepares ahead of time. His tutorials are straight to the point, with very little dawdling around.

Cycles promises to be an incredibly useful and fun addition to Blender's tools. At this point it does not have as many features as, say, Luxrender, but its potential is immense, especially considering the viewport render mode that could speed up setting up of scenes. It's not yet a finished product, either. some of te options have not been implemented yet. Having the capability of GPU rendering would be one of the reasons for me to upgrade as well. I keep salivating at some of tho killer GPUs I see around. Ah, one of these days... :)

You can watch Jonathan Williamson's tutorial on Cycles here.

Monday, September 19, 2011

My 3D Demo Reel

It feels weird, I have a demo reel... Such a serious-sounding thing. It actually was fun to make. iMovie did the job this time. I hope to create a better one sometime. I hope you like it :)

Wednesday, August 31, 2011

Review of "Back to the Start" animated short


I just watched Back to the Start, a short animation posted on vimeo by John Kelly, made for Chipotle Mexican Grill.

I think this is one of the best animations I've seen in a while. Some things I like about it are:

The camera angles. I like how the camera moves in simple, storytelling-like motions. I particularly like it when the camera travels from above, showing the, industrial path of pork and the environmental consequences.

The modeling and simplicity of the characters. I think that this simplicity is a stylistic one, sought after with the intention of emphasizing the story being told. Plus, it helps bring the focus on the concept of a simple life.

The overall color scheme, which is again in agreement with the message behind the animation.

Overall, a great animation, with lots of things to learn from.

Wednesday, July 13, 2011

A mountain scene

It's been a while since I posted, summer has a way of putting all projects on hold. Must be the wonderful sun that burns all left-over shreds of thought, the shimmering green waves that bring you back to the remote corners of conciousness.

Anyway, enough poetry—although I'd like to recommend this. My newest render is one I did following Andrew Price's tutorial on creating a realistic snowy mountain scene, part of The Nature Academy.

A snowy mountain scene. I'd like to make one with a tree line, particles for trees, barrancs (in English, gully,) and other terrain features.

Monday, June 20, 2011

Goban Scene—Final Render

Here is my final render on the Goban scene, created in Blender 2.57, rendered in Luxrender 0.8. The render time was some 30 hours, and reached 1300 samples per pixel. There are some areas where there is a bit of what's called fireflies—areas of overly light pixels that don't get resolved by the renderer. However, I think it's probably OK as it is right now.

Goban

Wednesday, June 15, 2011

Earth and Moon

Here is my result of following Andrew Price's newest tutorial, Create a Realistic Earth. This tutorial mostly focuses around materials, textures, material nodes, and a bit of compositing. Good job again, Andrew!

The only thing missing is the spaceship, or perhaps a meteor...

Japanese Room with Goban

Here is a composition I created using my recent Goban scene and a picture by Abbey Hesser, which I found on flickr. The photo has been used by persmission. You can visit Abbey's web site here.

The composition is not nearly perfect, it's more of a practice file.

Goban scene in a real Japanese room.

Sunday, June 12, 2011

Goban 2

Here is what I consider to be an (almost) final render for this scene. The white stones in the bowl were created using an in-development, beta version of Cheetah3D's bullet physics plugin, by Hiroto Tsubaki. I was forced to reduce both polygon count and output size, because I was getting a very low sample-per-pixel rate (something like 15 per hour!). I think I should call this piece "Goban by the window." If I do anything else to it, it would be working on the textures a bit (they need a bit of bumpmap,) the rice paper volume material, and modify the model of the fan a bit. I hope you like it.

Click to enlarge

Wednesday, June 8, 2011

Goban

Here is a scene I've been working on. I've had this idea for a while, I just could not put it together. With the newly released Luxrender 0.8, I finally decided it was time! Done in Blender 2.57. Enjoy!

Tuesday, June 7, 2011

Title Animation in Blender

I've been busy trying to finish a tutorial by Andrew Price on his blenderguru site. In this latest of his tutorials, he uses everything in blender but the kitchen sink: particles, smoke simulation, type, indirect illumination, sound effects, video editing, the use of different scenes, node compositing, you name it. I think it's one of his most ambitious tutorials to date. Great job! Here is the result. I did not follow the tutorial to the letter. I deviated a bit, introducing some morph keying for this lattice object. Great fun! Of course, I used my own blog name's for the lettering.

Thursday, June 2, 2011

Subway Scene 6

Here is an update of my subway scene. Added the (almost) final modeling touches to it, like a stop light, a mirror (way at the end of the station), electric cables, an entryway to the station. I finally fixed some issues I had with the Curve modifier. Besides making sure that everything in the object is set to default (0 location, 0 rotation, 1 scale,) one needs to make sure that the curve has the appropriate tilt applied to it. I had a couple of  these that, for some reason, needed to be adjusted. The way to do this is by selecting the whole curve in Edit mode, hitting Control-T, and dragging with the cursor, or entering a value. Mine was rotated 90 degrees, which forced me to rotate the elements 90 degrees in Edit mode. Yikes! Not anymore.

Tuesday, May 31, 2011

Subway Scene 5

Here is a quick update for the scene. I tried to get everything down to a realistic scale. That's why I added some human figures for comparison. The station might be a tad too tall, I'm not sure—is 8 meters too high? Frankly, I have no idea what the real proportions should be. I think I measured a real subway station at over 100 meters. Anyway, as long as everything look s reasonable, it should be OK. I added a bit more detail. Just a little more modeling left and I'll be done with that part of the project—I think :)

Monday, May 30, 2011

Subway Scene 4

Here is a render showing the progress I've been making on this piece. I've added some more details—like the trash cans, the billboards, and the rail bases. I decided to add the area lights by hand, that is, duplicating them one at a time. I also linked their data (Control-L) so that whatever change is effected on one of them will be shared by them all. I'm going to add some detail to the tunnel, some cables, a bit more of modeling inside the station, and I'll be ready to texture.

Thursday, May 26, 2011

Freaking Awesome Short Movie

You must see this! It's an incredible short animated movie put together by a few guys. The job they did is spectacular, and to me, it represents what 3D should be aspiring to. Namely: not just photo-realism, but over-realism. That is: 3D has the ability to depict things that can't be depicted any other way. For instace, notice how the innards of the bug are shown as the venom goes in its body. No imaging technology can achieve that—at least not easily. 3D gives us here a look at a secret space inaccessible by any the mean, except perhaps imagination.

Loom from Polynoid on Vimeo.

Subway Scene 3

Here si an update to my Subway Scene. The station is really beginning to take shape, although there are still many elements missing. This is perhaps the hardest part for me: deciding the shape of things and the general feel. Once I'm all done, I'll start breaking things :)

Wednesday, May 25, 2011

New Blog Title Design

I know, it's not the most exciting topic, but it's better than nothing :)
I've been thinking I'd like to come up with a spiffy lettering for the title of this blog. I've tried different things so far, but I'm not quite happy yet. What you see today is where I'm at: a kind of plasticky, GI, red, boldface look. The beach ball is related to the weather where I am now, Barcelona :)
I'm including a couple more designs I tried before. They both got voted down at home for being too spammy :D What do you think?

Version 1

Version 2

Tuesday, May 24, 2011

Getting Rid of the Grid in Cheetah3D

With the new 5.7 release of Cheetah3D, a long-time wish of mine has become a reality. You see, I hate the grid. Every time you open up a new document, the Grid option in the Style pop-up menu in the 3D view panel is reset to its default position—on (Figure 1). This is one of those "features" that can really kill the deal for me. If every time I start a new file I need to go and uncheck that option, pretty soon it's going to get very annoying. Even in the newest Cheetah3D version, this option is not saved in the preferences file. What's more, one can't really assign a keyboard shortcut to it either—I just double-checked this.

Figure 1. The Style pop-up
menu, where the Grid option
is on by default.
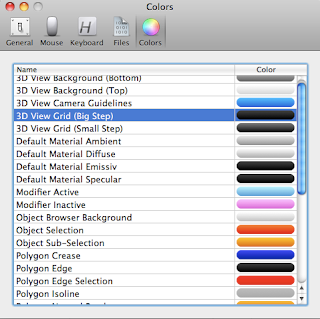
The way to get rid of the Grid for good is to change its color in the Preferences panel. Hit Command-Colon to access the Preferences panel. Click on the Colors tab. We will modify the color for the "3D View Grid (Big Step)" and "3D View Grid (Small Step)" options. Double-click on the color button next to "3D View Grid (Big Step)" (Figure 2.)

figure 2. Double click on the dark-colored button thingy
next to 3D View Grid (Big Step).

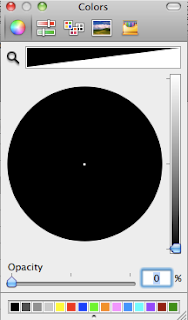
In the Mac-standard Colors dialog that shows up, drag the Opacity slider all the way to 0. This tells the program to turn that color to completely transparent (Figure 3.) Do the same for 3D View Grid (Small Step.)

Figure 3. The Opacity slider has been
turned down to 0.
When you go back to the 3D view, the grid won't be there anymore, even though the Grid option in the Style pop-up menu is on. The only thing that's left are the red and blue lines indicating the X and Z axis. These are part of the grid, but they, as far as I know, they can't be turned off.

Cheetah3D 5.7 Released

Today Cheetah3D 5.7 was finally released. Out of the beta stage, this release mainly improves some UI features. I think that the most important one is the possibility to assign a custom keyboard shortcut to all the functions in the program. In the past, this feature was limited to most (but not all) menu items. Now it has been greatly expanded, to the point where you can assign keyboard shortcuts to things like scripts and parametric objects—imagine pressing Control-C to create a cube :)

Also in the Preferences panel, many of the colors in the application can be customized. For instance, you can change the color of the background, or the color of the selected objects.

Additionally, Collada support has been improved, with the addition of animation support, among others.

It's great to see some of the UI aspects of the program being improved. I am a firm believer that, more than fancy features, what makes a program successful is a solid UI foundation. If you're a Cheetah3D user, let me know what you think of the new version.

Here's the link to Cheetah3D's download page.

Friday, May 20, 2011

Importing Multiple Images for Background in Blender

A few weeks ago, Andrew Price showed how to import multiple images at once using the Import Images as Planes addon in Blender 2.57. Today I came up with a way to use this feature to save me some time when using images as background.

I started working again on my subway scene, this time using reference pictures I took. I decided to activate the Background Images feature in Blender, so I could see these reference images right on my file. To access this feature, just press N (which brings up the Properties panel,) click on Background Images, then on Add Image, expand by clicking on Not Set, and click Open, browse to the desired file, and click Open Image.

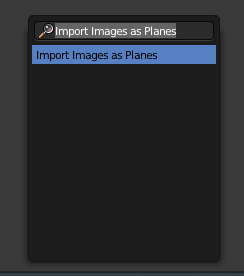
Now, imagine having to do that ten, twenty times. It gets boring quickly. What I did was use the Import Images as Planes addon. To use it, you must have it activated already—Andrew Price explains how to do this in his tutorial. Once it's activated, call it up by pressing Space and type 'import images' (Figure 1.)

Figure 1. Just type 'import images.' No need to type the whole thing.
Next, in the dialog that shows up, browse to the folder where you have the pictures you want to add. I used the settings shown in Figure 2.

Figure 2. These are the options I used when importing the images as planes.
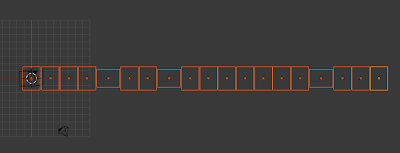
 The images get imported, all in a row, like shown in Figure 3. Press X to delete them all.

Figure 3
 When you go back to Background Images, now the drop-down menu allows you to use any of the image textures you just added (Figure 4). This is also useful across all the functions in the Blender that use textures. Your imported textures will be available to be used.

Figure 4