A few months ago I posted this render of mine as a kind of homage to Barça's best ever coach: Pep Guardiola.
As a result, I got some positive feedback and some requests that I make a tutorial on how to create the embroidery effect. I must admit that, from my perspective, it is an embarrassingly simple matter, but I can understand (and remember) the feeling of being completely lost when it comes to particle systems and trying to reproduce randomly behaving stuff in Blender. That's why I feel a tutorial is a good idea. I am including a starter file with textures created by me, links and attribution to all external textures. I recommend using the latest builds of Blender (2.64 or 2.65 if possible), because I am using n-gons—polygons that have more than 4 edges—which were not supported in earlier versions of the program.
-
Starter file just with my own textures
-NarrowPath_3k.hdr image from
HDRLabs
-
Wicker0020_15 from CGTextures
Before we go ahead with the tutorial proper, I want to suggest a simple exercise that will improve your chances of understanding how we are going to build this object. To sum it up, the embroidery effect was created with particle systems—specifically
hair particle systems.
Particle systems are a kind of special effect used in many 3D packages that control the emission or distribution of other objects (particles) in potentially random and organic ways. In Blender, particle systems are applied to objects, which
emit the particles along their
normals. In my example, I have the Barça coat of arms shape as several polygonal objects, each of which has hairs of differing color and orientation applied to it.
Let's do this simple exercise. Open up a new blender file. Do
not delete the default cube (I bet I surprised some blenderhead here). Make sure your cursor is on the 3D View window. Add another cube by pressing Shift-A, and then a 1 and a 2 (figure 1). Do not worry if you can't see the second cube. It's there, and it's called Cube.001. Without touching the mouse, scale the new cube down to 10% by pressing S and then . and 1 (figure 2). Notice we are not using the mouse or the cursor at all. Welcome to the power of Blender.
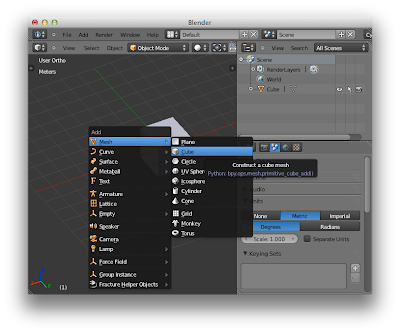 |
| Figure 1. Press Shift-A and then 1 and 2 to create a new cube. |
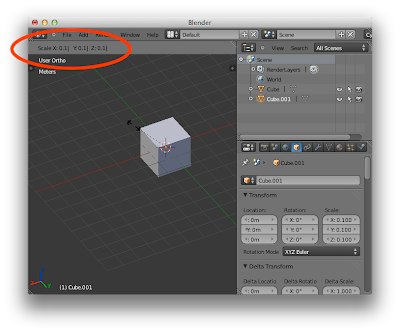 |
Figure 2. Press S, and then . and 1 to scale down to 10%.
Notice the info bar (upper left) reflects the scaling being applied. |
Select the first cube by left-clicking on its name in the Outliner panel. Switch to the particles panel by clicking on the icon shown on figure 3. Click on the plus sign that shows up below to add a new particle system.
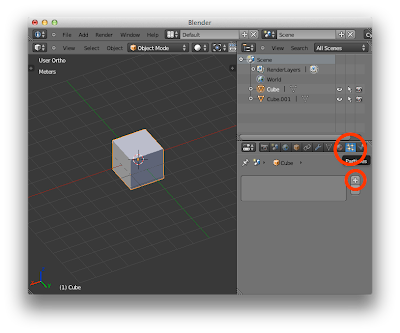 |
Figure 3. Switch to the Particles panel by clicking on the particle icon shown here.
Click on the plus sign to add a new particle system. |
|
Notice that the newly created particle system is called by default ParticleSystem, and the settings used by this particle system are also called the same. In the drop down menu next to Type, select Hair (figure 4). You should see something like this:
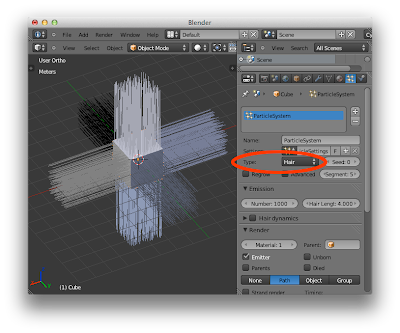 |
| Figure 4. Select Hair as type in the drop down menu. The cube has hair now. |
Scroll down the hair panel to find the Render sub-panel. Click on Object. In the Dupli Object (stands for duplicate object) field, type Cube.001 or click and select Cube.001. The original hairs get replaced by the tiny cubes. They are tiny because their size is, by default, 0.05, as specified in the Size field (figure 5).
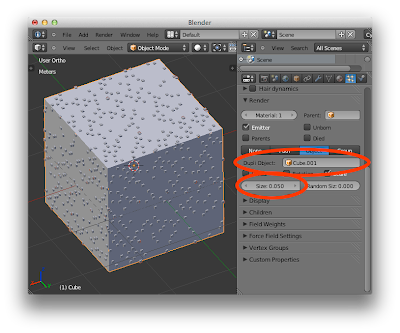 |
Figure 5. Notice that Cube.001 is what is being reproduced on the original cube, at a size
of 0.05 over the 10% reduced cube. I have zoomed in the scene so the tiny cubes can be seen. |
That's it for the introduction to particles. Let's build our Barça file now. Open the file embroidery_tutorial_starter.blend I provided in a link above.
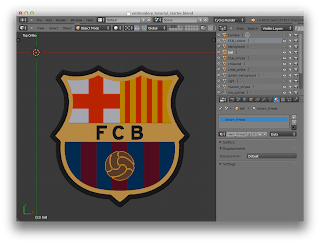 |
| Figure 6. Starter file. |
This file has all the objects and materials needed to create and render the scene. You might need to re-link the image textures that I am not including in the download. Since I am focusing mostly on using particle systems, I won't explain how to do this here. Some objects, like the light and the background are hidden from view, but they will render nevertheless. The individual embroidery stitches used for the different particle systems are all stored on layer 5 (see figure 7).
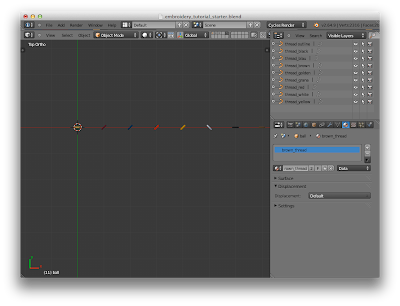 |
Figure 7. Layer number 5 contains the individual stitches, the hairs that will be used
to fill in the Barça coat of arms shapes with the embroidered effect. |
Click on layer 1, and Shift-click layers 2, and 3 to activate them. Select the object named
ball by clicking on it in the Outliner panel. Switch to the Particles panel if necessary. The object does not have any particle system applied to it
yet. Click on the plus sign to add a new particle system. I already created the settings I use for all the different objects, and made sure they will be saved even of they are not actively being used in the file (by highlighting the F icon next to the particle settings name). Click on the ParticleSettings drop-down menu and select the
Brown Thread settings (figure 8). There are many many settings that control how the emitted or hair objects behave in a particle system. Rather than bog you down with all these, just use the settings I have already created, and play with them once you feel comfortable enough.
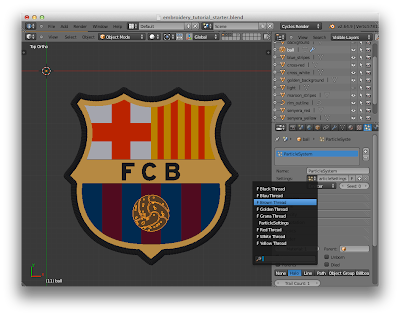 |
| Figure 8. Select the Brown Thread settings to apply them to the ball object. |
Keep selecting other objects in the scene and apply the pertinent particle system to each of them. Here is a list of objects with their corresponding particle setting:
-ball: Brown Thread
-blue stripes: Blau Thread
-cross_red: Red Thread
-cross_white: White Thread
-FCB_letters: Black Thread
-golden_background: Golden Thread
-maroon_stripes: Grana Thread
-senyera_red: Red Thread
-senyera_yellow: Yellow Thread
Notice that the stitches around the edge were created differently. They are using a path that controls the arrangement of an object around it. By now you should see something like this:
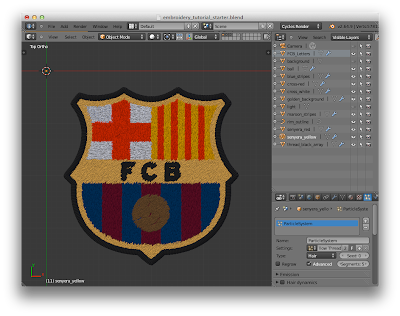 |
| Figure 9. What things look like on the 3D View. |
Just hit F12 now and let it render. Here is the result (figure 10), which took 3 minutes 34 seconds on my machine. I need a better Mac! You can fiddle around with the lighting, materials, or camera settings to give it a different look. Good luck and show me your results, and don't forget to press F3 to save the render!
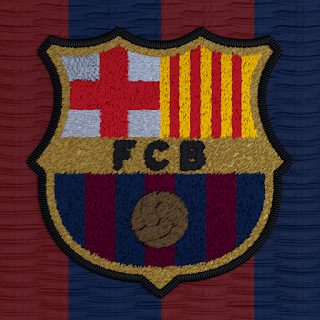 |
Figure 10. This is the basic render you'll get. My final render at the
top of the page had different lighting and some post-processing
applied to it. |


